2025 May 16,
The second part of CS 311 deals with the same triangle rasterization algorithm as in the first part. However, instead of implementing it ourselves, we learn how to use Vulkan to run the algorithm on the graphics processing unit (GPU). Then we layer new techniques atop the basic algorithm.
Remember our policies: Except where otherwise noted, each homework assignment is due at the start of the next class meeting. If you don't have an assignment finished on time, then don't panic, but do e-mail me about it, so that we can formulate a plan for getting back on track.
We do some of these tutorials in class on Day 14. Finish the others.
We are not learning OpenGL. We are just skimming it, to deepen our understanding of how the CPU controls the GPU. As you skim, keep these two questions in mind: How much communication takes place between the CPU and the GPU? How finely do we control the GPU (as opposed to having it do stuff for us by default and automatically)?
380mainOpenGL10.c: Skim, focusing on the render function and the call to glfwSwapBuffers. This code uses OpenGL 1.0 (1992). Why is it inefficient?
390mainOpenGL11.c: Skim, focusing on render. This code uses OpenGL 1.1 (1997). How is it more efficient, and how is it still inefficient?
400mainOpenGL15.c: Skim, focusing on render. This code uses OpenGL 1.5 (2003). How is it more efficient?
410shading.c: Skim. This file offers helper functions for making shader programs. Most of the code is error checking.
410mainOpenGL20.c: Skim. This code uses OpenGL 2.0 (2004). What is the big change from OpenGL 1.5 to OpenGL 2.0?
420mainOpenGL20.c: Skim, focusing on the comments. This code also uses OpenGL 2.0. The change from the previous tutorial is small, but it epitomizes my point about the programmer exerting more control.
430mainOpenGL32.c: Skim. This code uses OpenGL 3.2 (2009). You probably can't compile it. That's okay. There are several changes. How do they illustrate my point?
Now we start learning Vulkan. You are not expected to memorize specific function calls or structure definitions. You are expected to understand the high-level concepts and remember which files do what, so that you can look details up when you need them.
This first tutorial provides the extreme rudiments of a Vulkan setup for graphics (as opposed to, say, BitCoin mining or neural network training).
440gui.c: Skim. This file provides a simple window based on the GLFW toolkit. It doesn't do any Vulkan.
440vulkan.c: Skim. This file provides key machinery: Vulkan instance, physical device, logical device, etc.
440mainVulkan.c: Skim. This file should compile and run, showing a blank window. It should print responses to certain keyboard and mouse events. If you instead get errors, then try reconfiguring the constants according to the directions.
Unfortunately, we need a lot more machinery to get Vulkan going, before we can run a proper animation loop. The key concept here is the swap chain. Roughly speaking, it's the queue of raster images to be rendered and shown to the user.
450buffer.c: Skim. This file lets you use chunks of memory on the GPU.
450image.c: Skim. This file lets you use chunks of memory on the GPU, that are optimized for holding raster images.
450swap.c: Skim. This file provides the swap chain machinery.
450mainSwap.c: Skim. This file should compile and run, showing a black window.
This next program actually shows some imagery. Hooray. Also, we glimpse our first OpenGL Shading Language (GLSL) code.
460shader.vert: Study. This is a vertex shader written in GLSL. Even though I haven't taught you GLSL, can you guess what each line does?
460shader.frag: Study. This is a simple fragment shader written in GLSL.
460shader.c: Skim. This file lets you build shader programs from compiled GLSL shaders.
460vesh.c: Skim. This file lets you build meshes as vertex buffers and index (triangle) buffers. "Vesh" is my shorthand for "Vulkan mesh".
460pipeline.c: Skim. This code constructs the pipeline, which records a bunch of rendering settings, including how data are fed into the shaders.
460mainMeshes.c: Skim. In the instructions at the top, notice that you must compile not only this C file but also the two shader files. The running application should produce a static image in bright pinks, greens, and cyans.
The work, that we do now, is the first work to be handed in for this second course project. The goal is to package meshes better, so that we can write larger applications more easily. Along the way, we re-introduce some of our old graphics engine.
We do everything in single-precision floats rather than double-precision doubles, because a little extra precision is not worth doubling the memory required. Similarly, we use 16-bit uint16_ts for our triangle indices, even though they limit our meshes to 65,536 vertices each.
470vector.c: Make a copy of 240vector.c. Replace all doubles with floats. (I was able to accomplish this task using a simple search-and-replace.)
470mesh.c: Download. Starting with a copy of 360mesh.c, I have replaced all doubles with floats. I've also adjusted a bunch of ints to uint16_ts. Finally, I've deleted meshRender and its helpers. I'll never forget you, meshRender!
470mesh2D.c: In a copy of 180mesh2D.c, replace all doubles with floats.
470mesh3D.c: Download. Starting with a copy of 240mesh3D.c, I have replaced all doubles with floats, and I've replaced several ints with uint16_ts.
470vesh.c: Study. There are two methods for you to implement. I recommend that you implement them by copying a bunch of functions from 460vesh.c into the private section of this file and then calling those functions from the methods. In the end, this file should not rely on 460vesh.c, because that file is not part of our engine.
470shader.vert: Make a copy of 460shader.vert. Meshes built by the functions in 470mesh3D.c have a certain attribute structure: XYZ, ST, NOP. Update the vertex shader accordingly. Make the varying color however you like, as long as you use at least two of S, T, N, O, P. Compile this new shader to 470vert.spv.
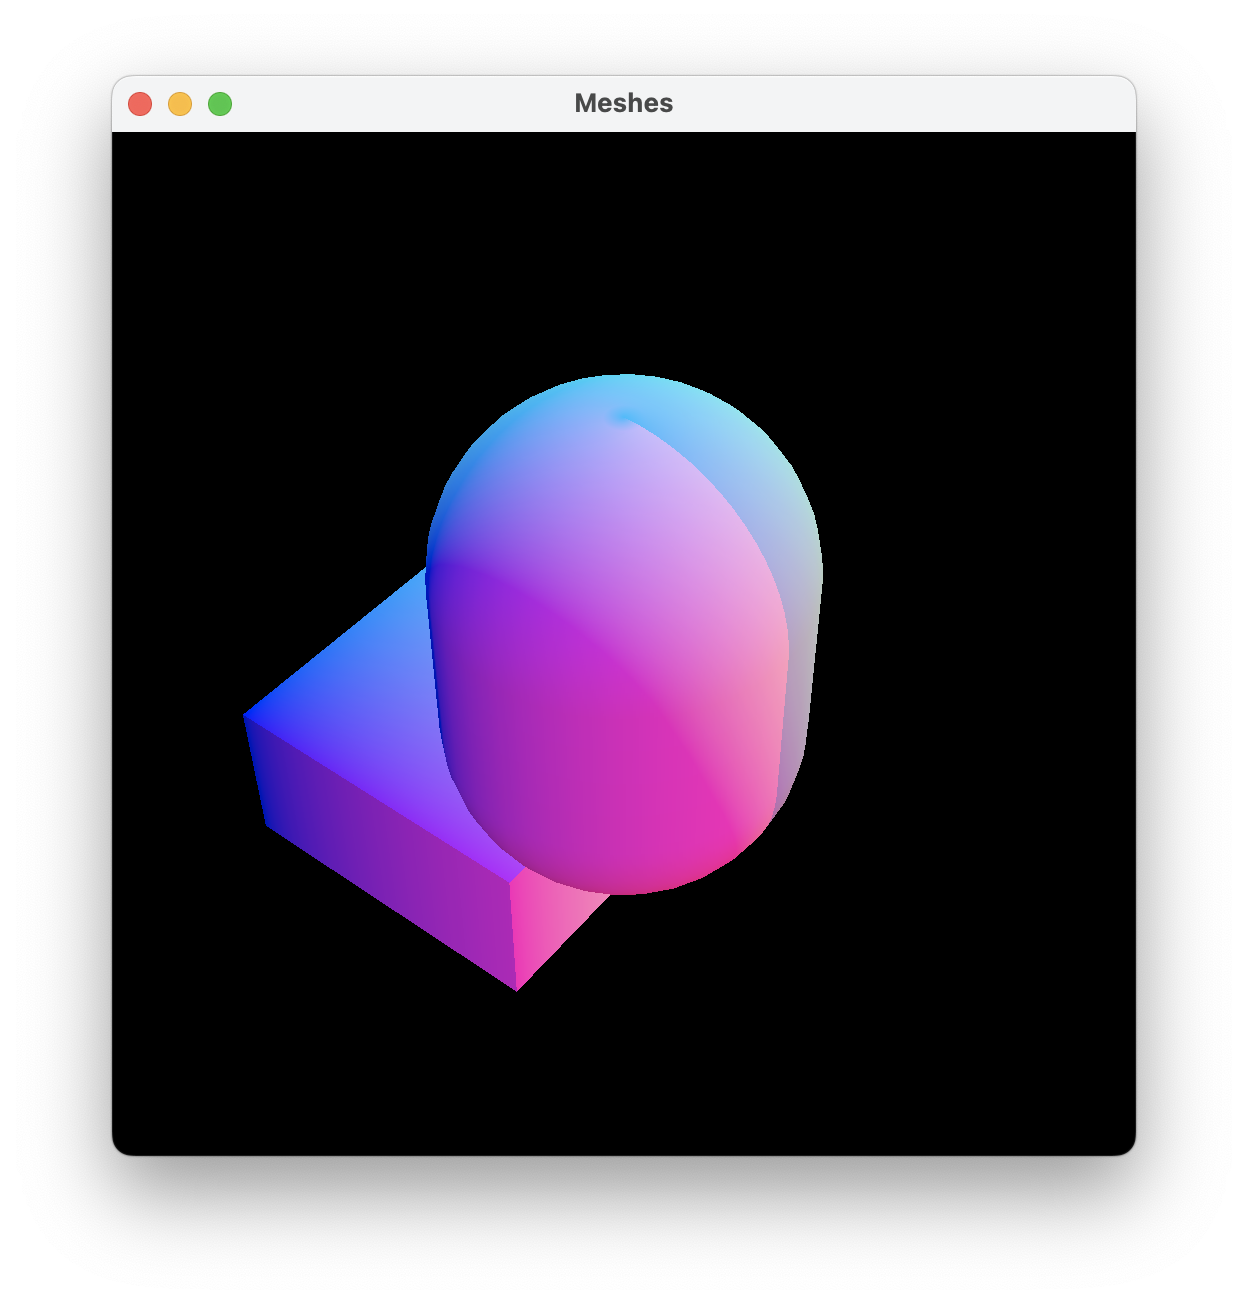
470mainMeshes.c: Make a copy of 460mainMeshes.c. Make sure that 460vesh.c is not included! Adjust the rest of the code to initialize, render, and finalize two decent meshes, as follows. Include the five "470....c" files. In initializeArtwork, make sure that 470vert.spv is loaded. There are six global variables and one global constant pertaining to mesh style. Replace them with a single veshStyle global variable. In initializeArtwork, replace the call to veshGetStyle with a call to veshInitializeStyle. Don't forget to finalize the style in finalizeArtwork. Wherever pipeInitialize is called, you need to pass it certain members of the style. Remove all 16 global variables pertaining to meshes A and B. Replace them with two global variables holding veshVeshes. In initializeArtwork, initialize them from two temporary 3D meshMeshes of your choosing. Don't forget to finalize the veshes in finalizeArtwork. Elsewhere in this file, there is a chunk of code that renders the two veshes. Carefully replace that chunk with two calls to veshRender. Then you should be done. Here's a screenshot of my version, which uses a box and a capsule:
You have five files to hand in: 470vector.c, 470mesh2D.c, 470vesh.c, 470shader.vert, and 470mainMeshes.c. Make sure that each C file credits both partners in a comment at the top. (In some C files, the old partners should be credited too!) Make sure that each file is working, clean, and commented appropriately. Make sure that both partners have a copy of each file. Then, just one partner submits the files to their hand-in folder on the COURSES file server.
This tutorial shows how to declare and set uniforms that have a single value across the entire scene. Practical examples include the camera and the lights (which we study later). An important concept here is descriptors, which specify how the uniforms connect to the shader program.
480shader.vert: Study. The camera matrix is now being passed into the shaders as a uniform.
480shader.frag: Study. We also pass a color into the shaders, just as another example.
480uniform.c: Skim. This file helps us allocate the memory needed to pass data into shaders through uniforms.
480description.c: Skim. This file helps us communicate the structure of the uniforms to the shaders.
480mainUniforms.c: Study. Don't forget to compile the two shader files. The running application should produce a rotating version of the previous tutorial's imagery. In setSceneUniforms, change the uniform color, to check that it produces the correct effect in the fragment shader.
The preceding tutorial uses a pretty crummy camera. Let's replace it with the camera machinery from our first course project. (We leave the meshes unimproved this time.)
490matrix.c: In a copy of 280matrix.c, replace all doubles with floats.
490isometry.c: In a copy of 300isometry.c, replace all doubles with floats.
490camera.c: In a copy of 300camera.c, replace all doubles with floats. Near the top of the file, declare the following constant matrix. It is needed, to make our projections match Vulkan's conventions, as follows. The function camGetOrthographic should output camVulkan times what it used to output. Delete the comment just before that function, because it is no longer accurate. Delete camGetInverseOrthographic, because it is no longer accurate and we don't need it. Then repeat these steps for the perspective projection. Check that camGetProjectionInverseIsometry is using these new projection matrices.
const float camVulkan[4][4] = {
    {1.0, 0.0, 0.0, 0.0},
    {0.0, -1.0, 0.0, 0.0},
    {0.0, 0.0, 0.5, 0.5},
    {0.0, 0.0, 0.0, 1.0}};
490mainCamera.c: In a copy of 480mainUniforms.c, #include 470vector.c and the 490....c files. Declare global variables for the camera's ρ (rho), φ (phi), and θ (theta), to be used in camLookAt and camSetFrustum. (Don't forget that camSetFrustum's focal length should always match camLookAt's ρ.) Configure a camCamera as part of the artwork, using camSetProjectionType and those two camera functions, getting the width and height from swap.extent.width and swap.extent.height. In setSceneUniforms, set the uniform matrix using the camera and mat4Transpose. Delete code that's no longer needed. Test.
490mainCamera.c: Add a keyboard handler that lets the user increase/decrease θ with L/J and lets them switch projection type with P. Test.
490mainCamera.c: Have you tried resizing the window? Try making it really tall and narrow or short and wide. Probably the image appears distorted, because the camera no longer knows the window size. We need to fix that. When the user resizes the window, finalizeInitializeSwapChainPipeline is called, and inside that function swapInitialize is called. At any time after that swapInitialize — either in finalizeInitializeSwapChainPipeline or during the next frame's rendering — the camera can call camSetFrustum to update the width and height. Implement this idea now. The exact details depend on how and where you update the camera. When it's working correctly, the window size may affect the size of the rendered meshes, but it should not affect their shape. They should not be distorted.
You have four files to hand in: 490matrix.c, 490isometry.c, 490camera.c, and 490mainCamera.c. Make sure that they are credited, working, clean, and commented. Make sure that both partners have copies. Then one partner submits them to COURSES.
In the preceding exercise, we inform the camera that the window size has changed. What other part of the triangle rasterization algorithm needs to be informed of window size changes? Apparently it is happening correctly, somewhere in our code. Where?
The code introduced today works on macOS, Linux, and probably Windows, but it does not work on Windows Subsystem for Linux (WSL). If you are using WSL, then shift to working on the lab computers in Olin 304 for today and the rest of this project. Sorry for the inconvenience. :(
Let's use the term "body" to mean "object in the scene". A scene might contain many bodies: a landscape, a tree, a bird, etc. Let's assume that all of the bodies have the same kinds of uniforms; for example, each body might be positioned and oriented using a 4x4 modeling matrix. However, they usually don't have the same values for those uniforms; for example, they don't all use the same modeling matrix. This tutorial shows how to declare uniforms that can be set with body-specific values.
500shader.vert: Study. The modeling matrix is now passed into the vertex shader as a uniform.
500mainUniforms.c: Study. If everything is working, then one of the two bodies rotates, the other does not, and the camera revolves around them.
In this final Vulkan tutorial, we introduce texture mapping. Technically, textures are a kind of uniform. In some ways they are treated like other uniforms; for example, they require descriptors. In other ways they are different from other uniforms; for example, they don't live in uniform buffer objects, and the process of setting them scene-wide or per-body is a bit surprising.
reddish.png, bluish.png, grayish.png: Download these three textures.
510shader.vert: Study. We share the body uniforms between the vertex shader and the fragment shader, so we have to change the vertex shader, even though only the fragment shader benefits from the new body uniforms.
510shader.frag: Study. The fragment shader has access to all three textures in the scene. It samples from two of them as chosen by the body uniforms.
510texture.c: Skim. This file provides two kinds of machinery: textures, and the samplers that sample from them.
510mainTextures.c: Study. The running application texture-maps each mesh with two textures.
Imagine a later version of this program, that contains several meshes. How would the code change, if there were six textures in the scene, still with two being used on each mesh? How would the code change, if five textures were being used on each mesh?
The code for the textures is messy, in that we maintain 14 variables to handle three textures and two samplers. What is a good way to abstract this code? Should we make a texTexture class? How would that class improve the code? Might it make the code worse? Should we make a texArray class? How might it improve or worsen the code?
Now that we have all of the essential features of the triangle rasterization algorithm, we start adding not-essential-but-popular features. Let's start a new "baseline" program, from which we can all progress together.
520shader.vert: Study.
520shader.frag: Study. (By the way, the intensity exactly matches the one used in 340mainLandscape.c.)
520landscape.c: In a copy of 340landscape.c, replace all doubles with floats.
grass.jpg, rock.jpg, water.jpg, hero.jpg: Download these four textures. Feel free to replace them with your own, as long as yours use similar colors.
520mainBaseline.c: Study. The running program shows an abstract hero (a person? penguin? robot? Totoro?) walking across a randomly generated landscape. Sometimes the hero is underwater. Try the movement controls (W/S, A/D). Try the camera controls (J/L, I/K, U/O, P). If something's not working, then fix your code from the earlier exercises. Don't alter this file.
There used to be another section here, consisting of work for you to hand in. I have moved that section to the next day's work. So there is nothing to hand in today. :)
Our first not-essential-but-popular feature is a scene graph, which organizes the bodies in the scene. We implement only the most basic scene graph features, such as compounding isometries. (Later in the course, we might talk about, but not implement, more advanced features.) More than usual, my instructions proceed by baby steps.
The first step in making a scene graph is making a decent abstraction for a body in the scene. The demo program here produces exactly the same imagery as 520mainBaseline.c does, but with cleaner code.
530body.c: Study.
530mainBody.c: Start with a copy of 520mainBaseline.c. Raise the definition of BodyUniforms to the #include section, just before you include 530body.c. Just before initializeScene, declare four global variables to hold the scene's bodies. In initializeScene, bodyConfigure those bodies. Also, set one texture index in each body. In setBodyUniforms, update the four bodies' isometries if necessary, then call bodySetUniforms four times, then do the big memory copy to the GPU-side buffer. In recordCommandBuffer, you should have four calls to bodyRender (and no veshRender or bodyUBOOffset). Test. The imagery should match the imagery of 520mainBaseline.c.
In this section, our demonstration program again makes exactly the same imagery. But the bodies are connected into a small scene graph.
540body.c: Study. There are two un-implemented methods. Don't implement them yet. Baby steps.
540mainScene.c: In a copy of 530mainBody.c, include 540body.c instead of 530body.c. Update the calls to bodyConfigure, passing NULL for the new arguments. Test. The imagery should not be different.
540mainScene.c: In initializeScene, make the four bodies siblings of each other. To match the indexing still being used in setBodyUniforms and recordCommandBuffer, the order should be grass, rock, water, hero. Test. The imagery should not be different.
540body.c: Implement the bodyRenderRecursively method. This method needs to handle the indexing delicately. It might help to look ahead to the next step...
540mainScene.c: In recordCommandBuffers, replace the four calls to bodyRender with one call to bodyRenderRecursively. Test. The imagery should not be different.
540body.c: Implement the bodySetUniformsRecursively method. This method needs to handle the indexing delicately. To finish this step, it might help to look ahead to the next step...
540mainScene.c: In setBodyUniforms, replace the four calls to bodySetUniforms with one call to bodySetUniformsRecursively. Test. The imagery should not be different.
540mainScene.c: Let's do some more strenuous testing. In initializeScene, change the structure of the scene graph to each of the following variations. (You might also need to tweak setBodyUniforms and recordCommandBuffers, to start the recursions from the eldest root of the scene graph.) Test each variation.
At the end of the tests, restore the scene graph to its original state: grass, rock, water, hero, as siblings in that order. Test.
540body.c: If a body has no vesh, then does it still consume one index's worth of UBO? That should work, as long as you're consistent between bodySetUniforms and bodyRender. But it is wasteful, because those uniforms will never be used. Try not to be wasteful. If you change code here, then re-test of course.
In the usual way, make sure that 530mainBody.c, 540body, and 540mainScene.c are credited, working, clean, commented, and shared with both partners. One partner submits them to COURSES.
Today we finish our scene graph. We also begin our study of lighting, which is probably the most popular non-essential feature in all of 3D graphics.
For what follows, we need a little more artwork: a tree (the kind made out of wood, not bits). This task gives you a chance to exercise a little creativity, and to demonstrate that you understand how our code works thus far.
On paper, chalkboard, etc.: Design a tree. For example, a simple tree could be a sphere of foliage attached to a capsule trunk. A fancier tree might have a branch coming off the trunk, consisting of another capsule and sphere. My requirements are as follows. Your tree must use exactly two textures: one for foliage and one for bark. Your tree must use at least two bodies, joined together into a little scene graph with exactly one root. Also, get the foliage and bark textures that you need. You might photograph them in real life, or draw them by hand, or get them from a friend. They should be JPGs or PNGs, and they must be loadable by the STB Image library, of course. Make sure the file sizes aren't gigantic.
550shader.frag: In a copy of 520shader.frag, you need more textures. Don't forget to compile.
550mainTree.c: Make a copy of 540mainScene.c. Use the new fragment shader. Make whatever veshes and textures your tree requires, but don't hook them into the scene yet. Test. You should have the same imagery as before now. There should be no errors at startup, while running, or at exiting.
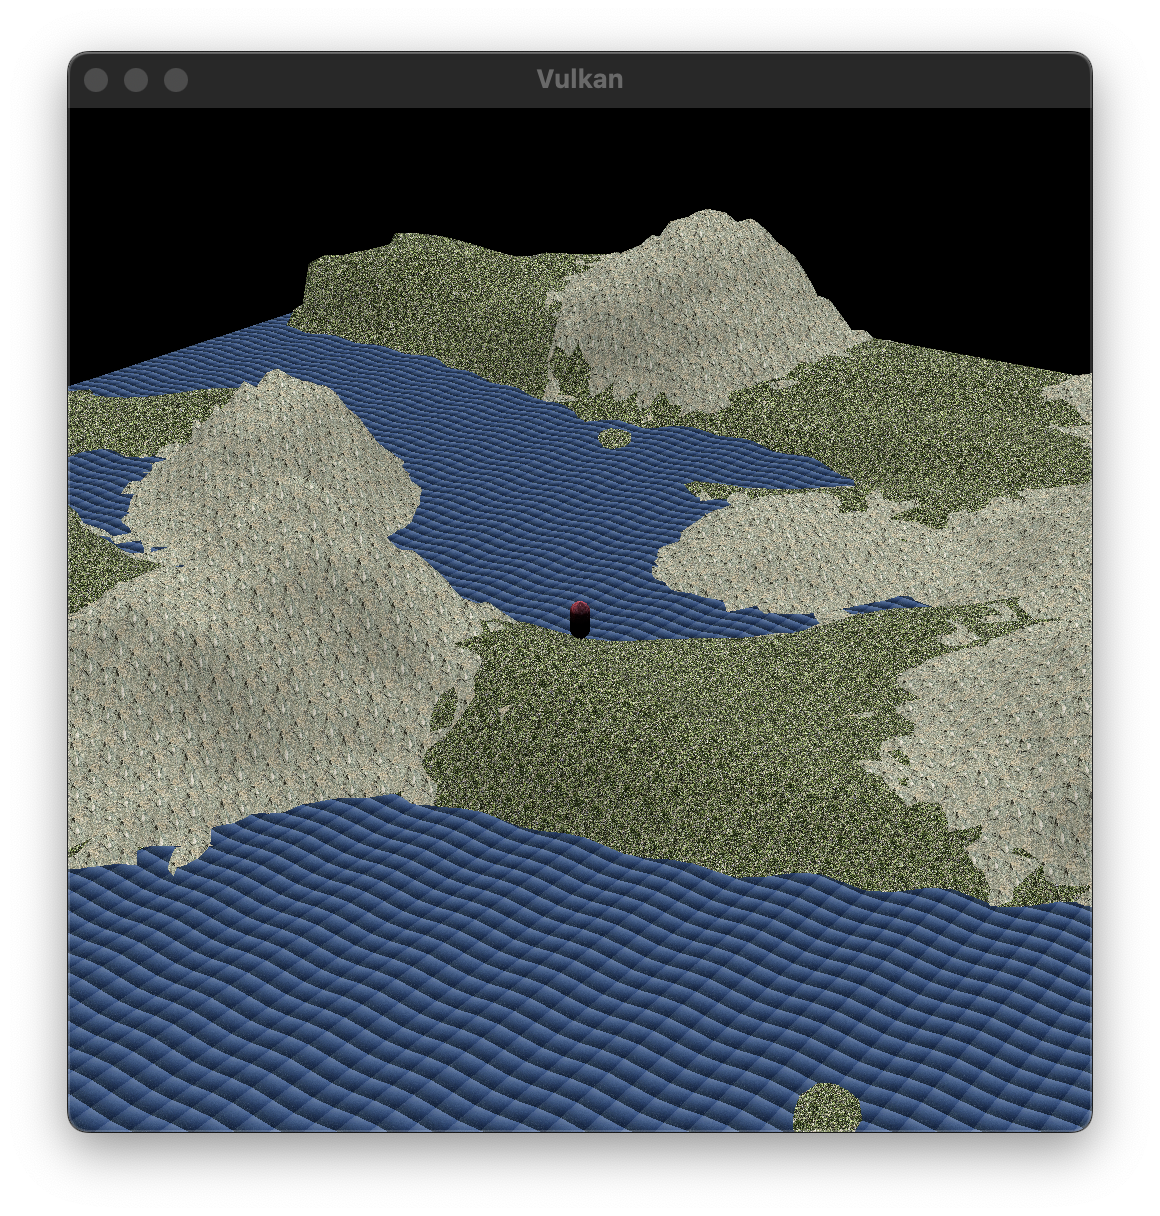
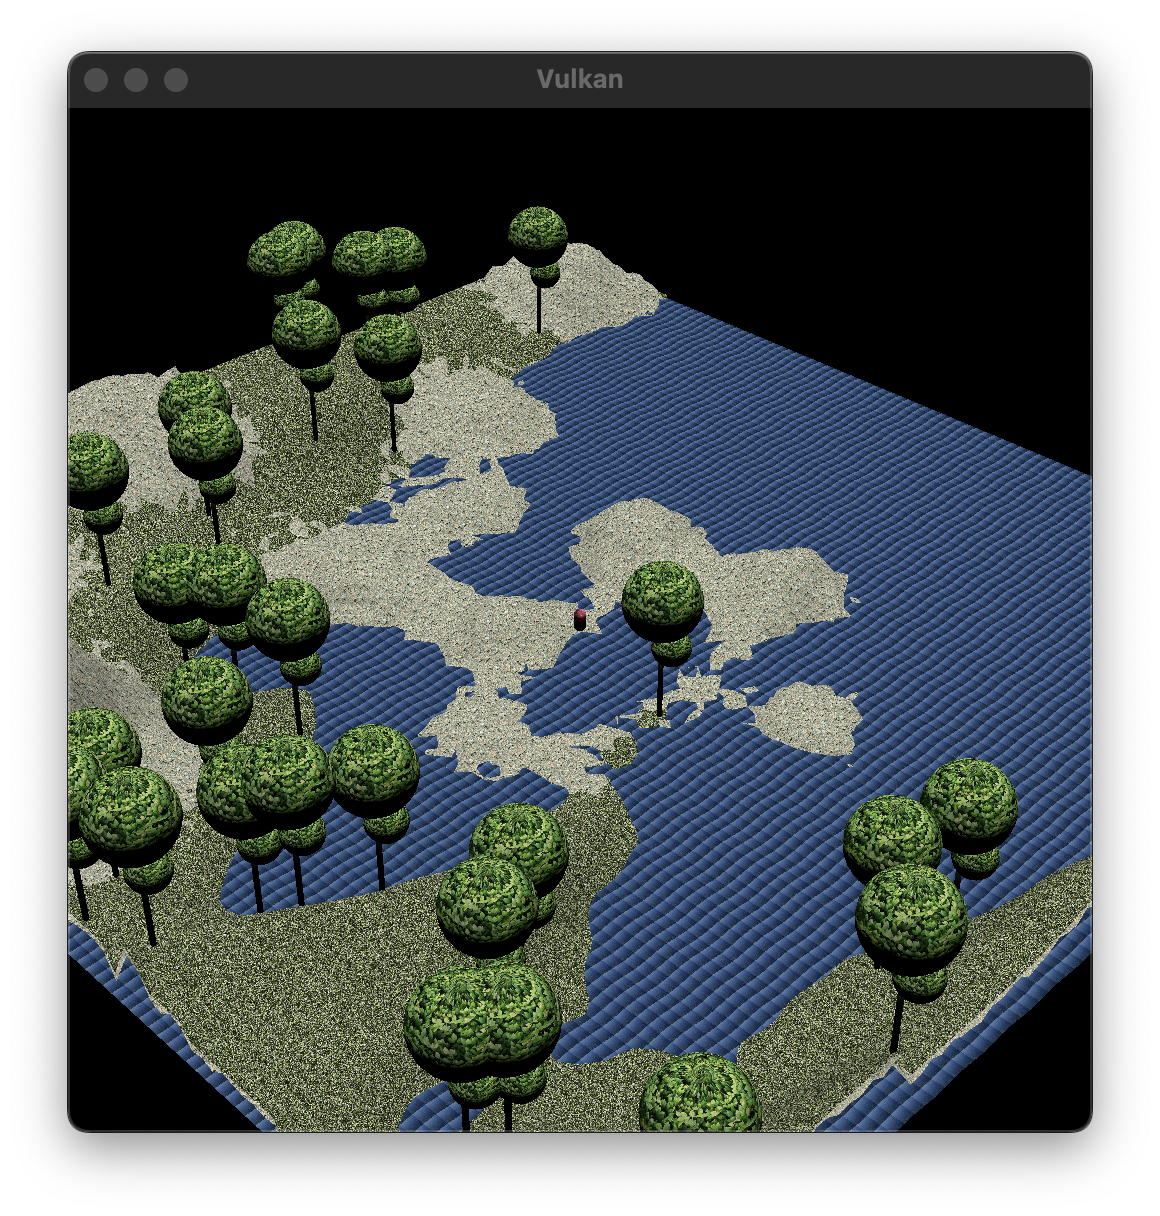
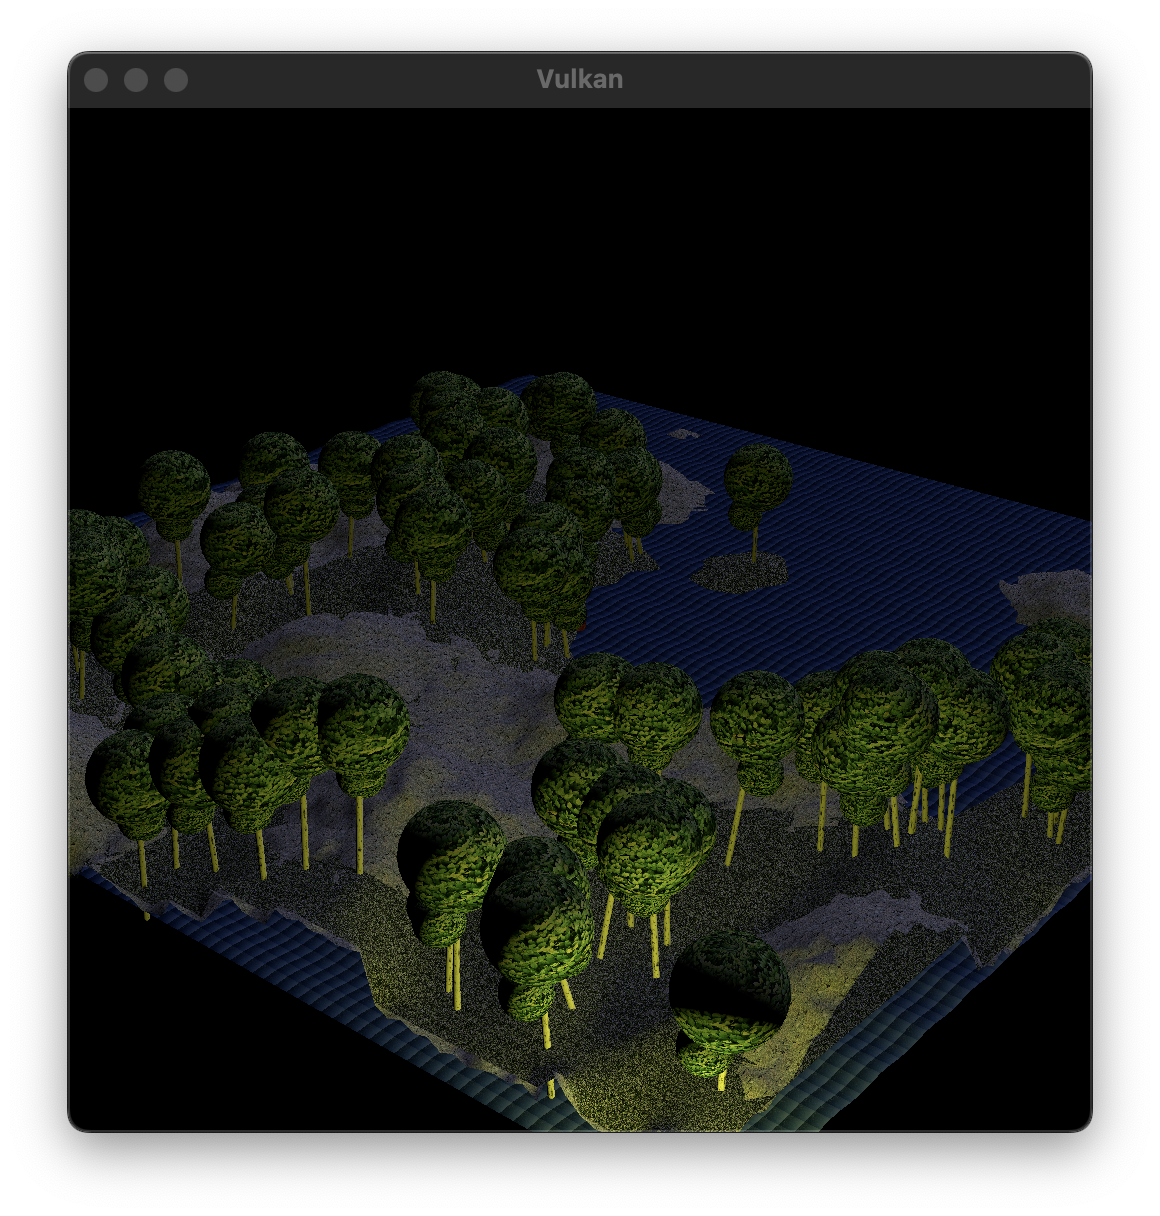
550mainTree.c: Make whatever bodies your tree requires, hooked together (into a mini-scene graph with just one root). Make the tree's root body a child of the grass body. Now the value of bodyNum should be 4 plus however many bodies you use to make your tree. Test. Unless you've gone out of your way to control the placement of the tree, it should appear at the scene origin, which is near one of the corners of the landscape and perhaps below or above the ground. Mine looks like the scene below left.
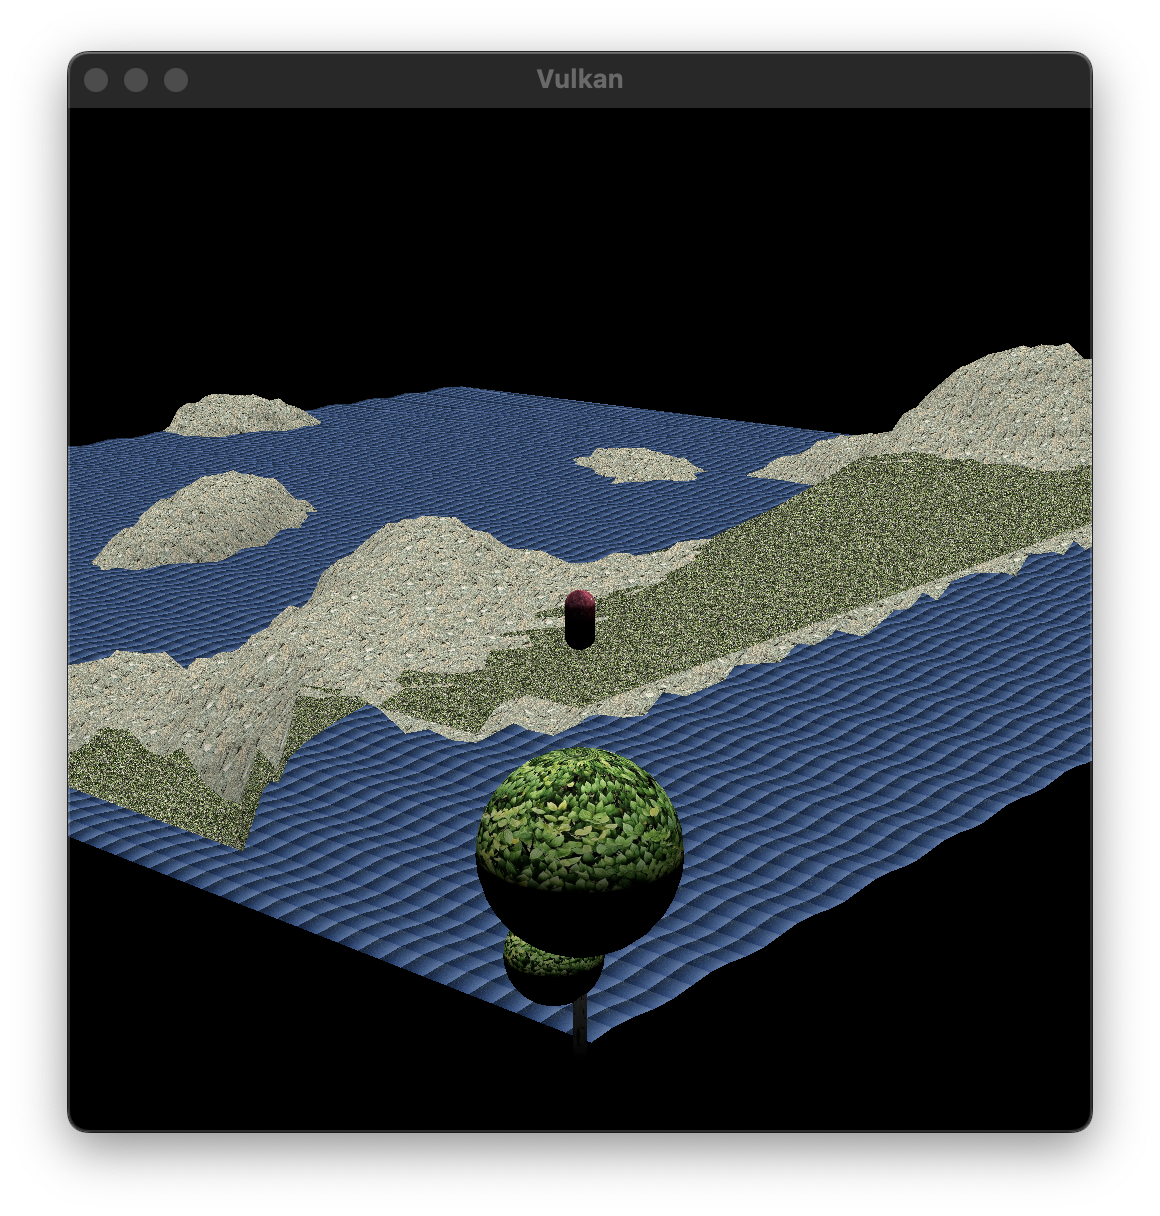
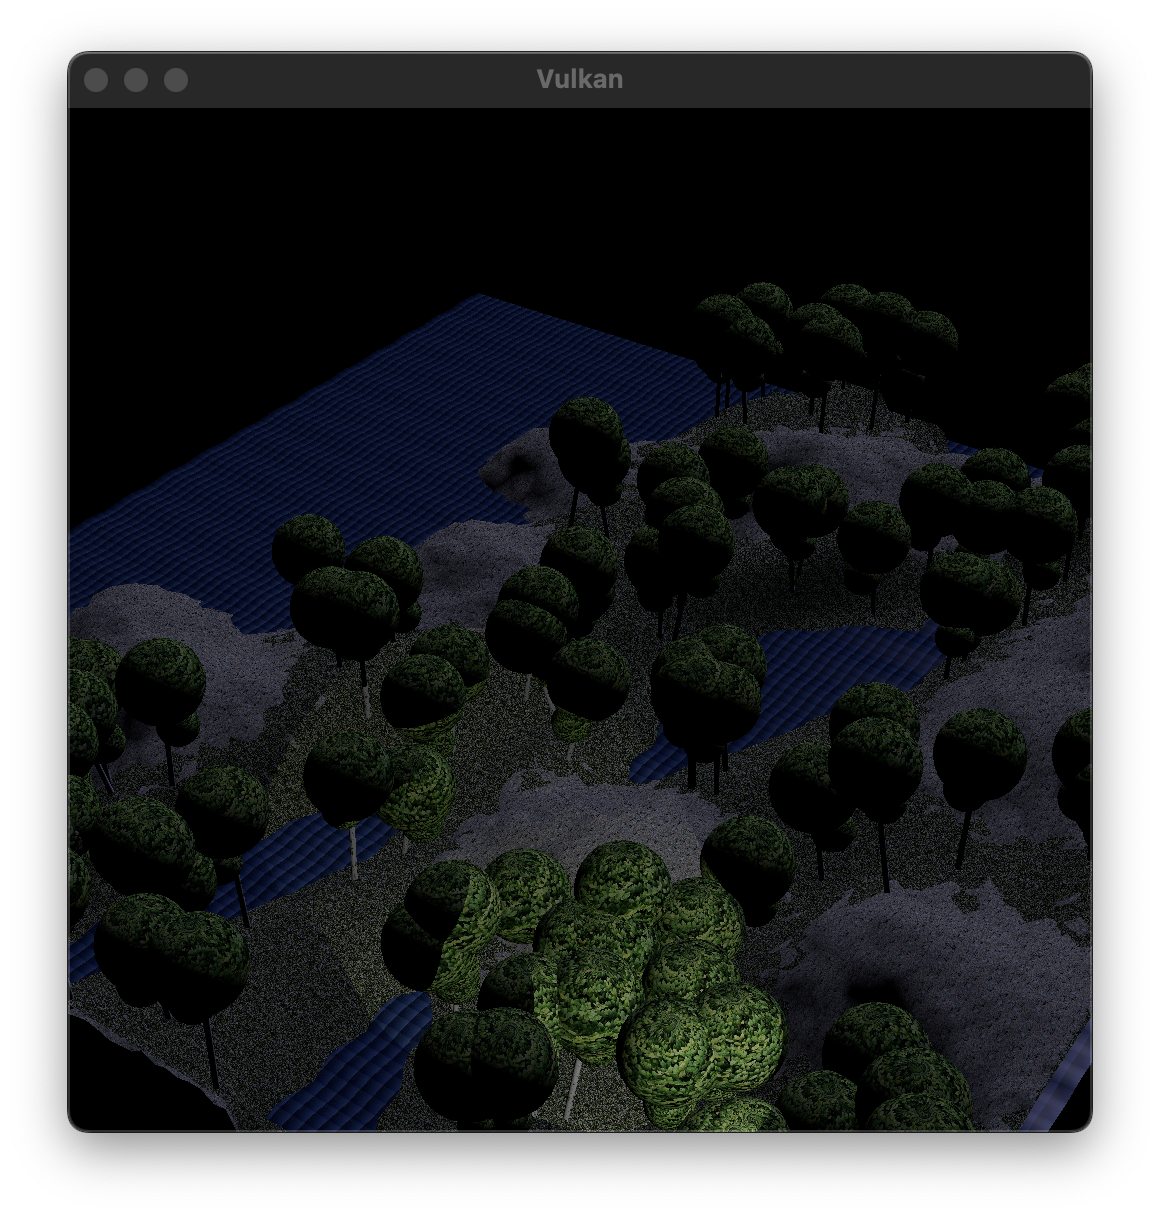
550mainTree.c: Alter the translation on the root body of the tree, so that the tree is placed randomly somewhere on the grass. How do you do that? Use the (poorly named) landDouble function to pick world x and y coordinates between 0.0 and SIZE - 1.0. Then use the elevation function to get the grass's elevation, and to make sure the grass isn't under rock or water. If it's under rock or water, then try again. In the end, mine looks like the scene above right.
My tree bark is nearly white, but it appears black in the images above. Why? (It's not a bug. It's a design feature, which we improve later.)
One application of scene graphs is instancing: placing many copies of a piece of art into a scene. In this exercise, we use instancing to turn one tree into a forest of trees.
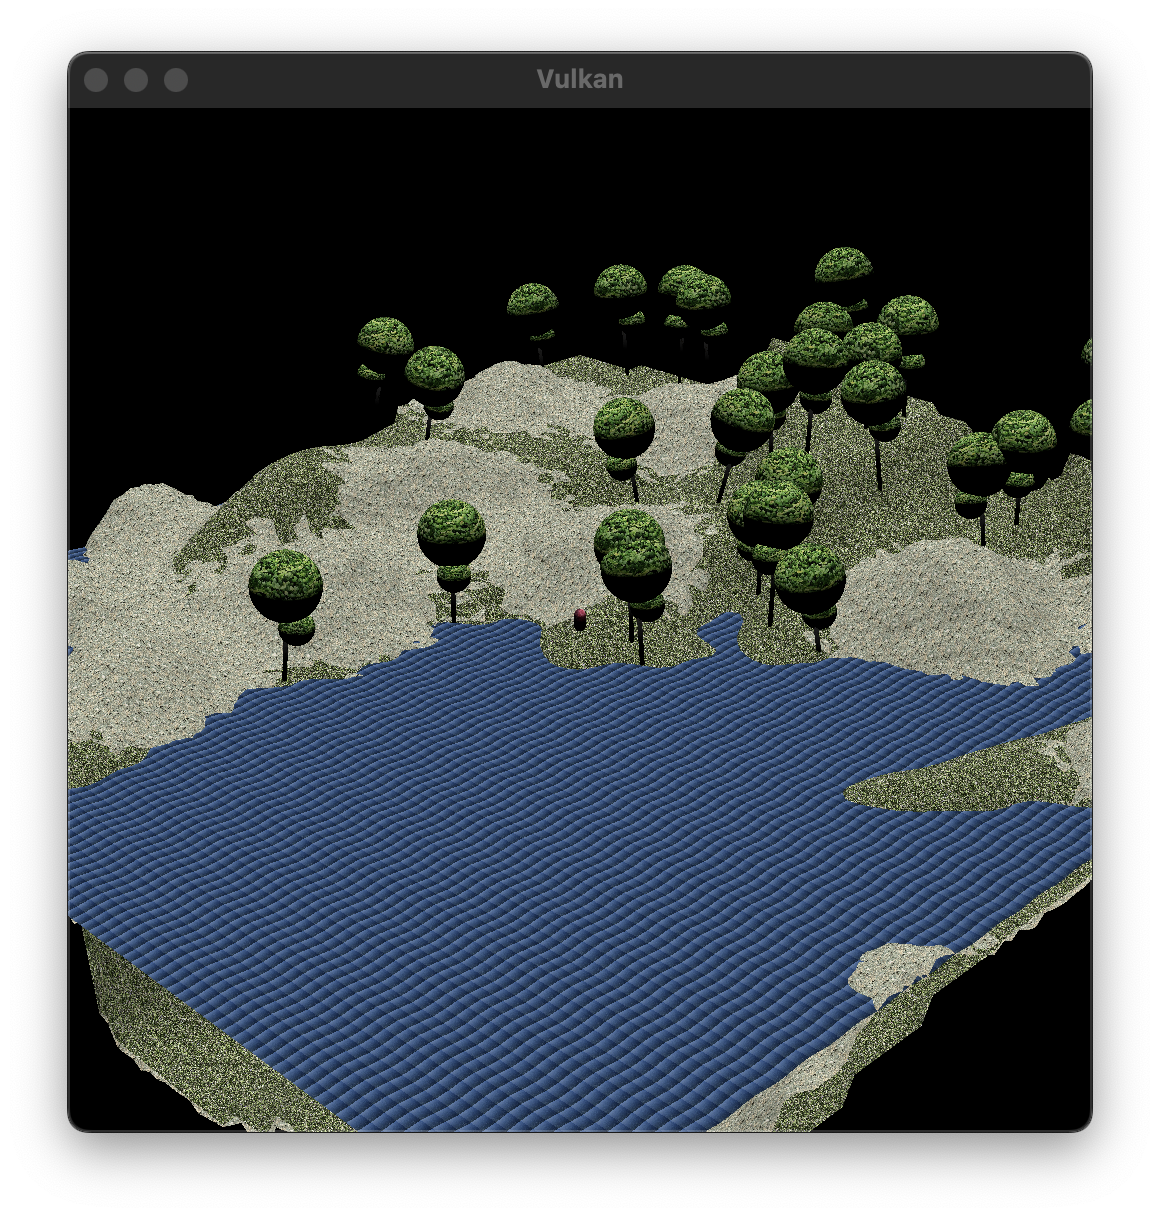
560mainInstancing.c: In a copy of 550mainTree.c, make a constant NUMTREES, setting it to something like 3 for now. Add NUMTREES bodies to the scene. These new bodies should have NULL veshes. They should all be children of the grass body, and they should all have your tree's root body as a child. They should be given translations that place them randomly on the grass in the scene. Your original tree should no longer be a child of the grass, and it should have a trivial isometry. The value of bodyNum probably needs to be 4 plus NUMTREES times however many bodies you are using to make your tree. Test. You should see three trees now. By increasing NUMTREES, you should be able to make a larger, denser forest. My screenshot is below left.
In the usual way, submit 550shader.frag, 550mainTree.c and 560mainInstancing.c to COURSES. Also submit your texture files.
Probably your forest looks rather dull, because all of the trees are identical. By randomly tweaking the vesh-less bodies, you can make the forest a bit more interesting.
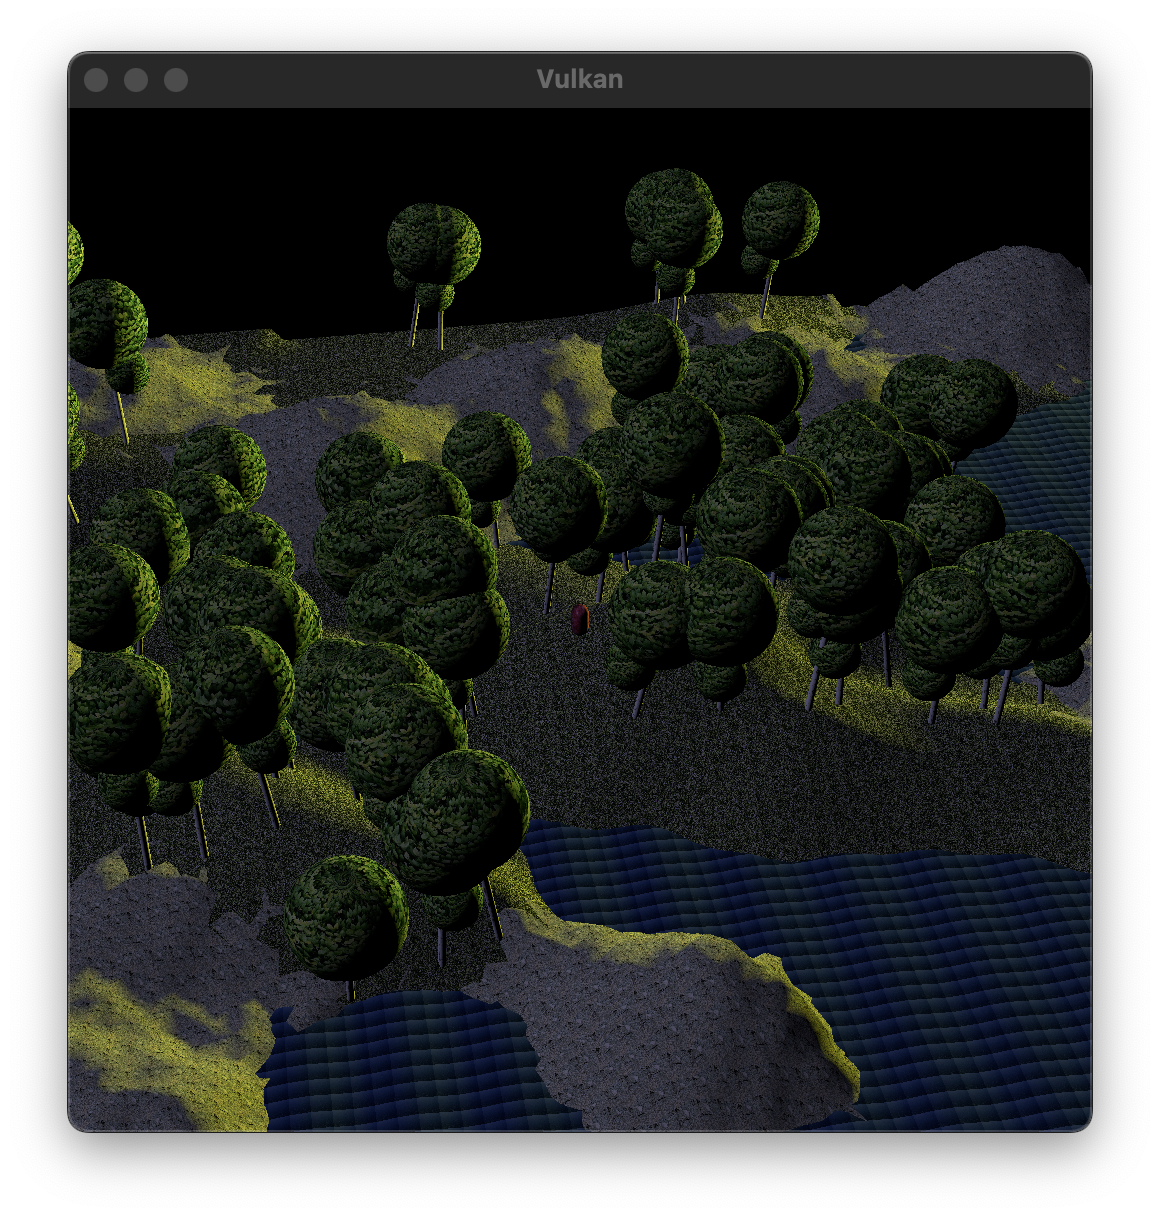
570mainInstancing.c: In a copy of 560mainInstancing.c, try one or more of the following ideas. Randomly translate the vesh-less bodies down into the ground, so that some trees appear shorter than others. Randomly rotate the vesh-less bodies about a vertical axis, so that the trees face in different directions. Randomly rotate the vesh-less bodies about some other axis, so that the trees lean slightly in various directions. See my screenshot above right. You could even animate that rotation, to make the trees sway in the breeze.
If you choose to do this exercise, then please submit 570mainInstancing.c to COURSES in the usual way.
If you want to check out the examples that I've shown in class, then follow these links. The point here is simply that artists have diverse goals for lighting, both realistic and unrealistic.
Judith and Her Maidservant by Artemisia Gentileschi, circa 1625
Still life with oysters, a rummer, a lemon and a silver bowl by Willem Claesz. Heda, 1634
An Experiment on a Bird in the Air Pump by Joseph Wright of Derby, 1768
Sudden Shower over Shin-Ohashi bridge and Atake by Hiroshige, 1857
Bal du moulin de la Galette by Pierre-August Renoir, 1876
At the Cafe-Concert: The Song of the Dog by Edgar Degas, 1870s
The Third Man directed by Carol Reed, 1947 (excerpt)
Gettin' Religion by Archibald Motley, 1948 (originally in color)
Today we implement Lambertian diffuse reflection from two light sources — one directional and one positional. We also throw in some ambient light.
Here's diffuse reflection for a directional light.
580shader.vert: In a copy of 520shader.vert, add vectors for ulight and clight to the scene uniforms. Remove the nop varying. Instead, compute unormal and pass it through the varyings.
580shader.frag: In a copy of 550shader.frag, update the scene uniforms and remove the nop varying. Also remove intensity. Receive dnormal through the varyings, and re-normalize it to unormal. Calculate the diffuse reflection, using the sampled texture color for cdiffuse. The result is the final fragment color.
580mainDirectional.c: Make a copy of 560mainInstancing.c or 570mainInstancing.c. Edit the code to use the new shaders. Update the scene uniforms, initializing ulight and clight to sensible values. Test.
Here's diffuse reflection for a positional light. (The directional light isn't removed. You end up with two lights in the scene.)
590shader.vert: Make a copy of 580shader.vert. For the positional light, add a plight and another clight to the scene uniforms. Make a varying, called something like pvertex, to hold the world position of the vertex.
590shader.frag: Make a copy of 580shader.frag. Update the scene uniforms. Receive pfragment through the varyings. Use it to compute the positional light's ulight and diffuse reflection. Now you have diffuse reflections based on two lights; add them to get the final fragment color.
590mainPositional.c: In a copy of 580mainDirectional.c, edit the code to use the new shaders. Update the scene uniforms. Give the positional light a color that is different from the directional light's color. I want the positional light to be in specific place: (0, 0, Z), where Z is 1 more than the elevation of the grass, rock, and water (whichever is highest) at (0, 0). So the light should be just above the surface near the origin. Test.
Here's diffuse reflection for ambient light (in addition to the two actual lights in the scene).
600shader.vert: In a copy of 590shader.vert, add cambient to the scene uniforms.
600shader.frag: In a copy of 590shader.frag, update the scene uniforms. Add the ambient contribution to the final fragment color.
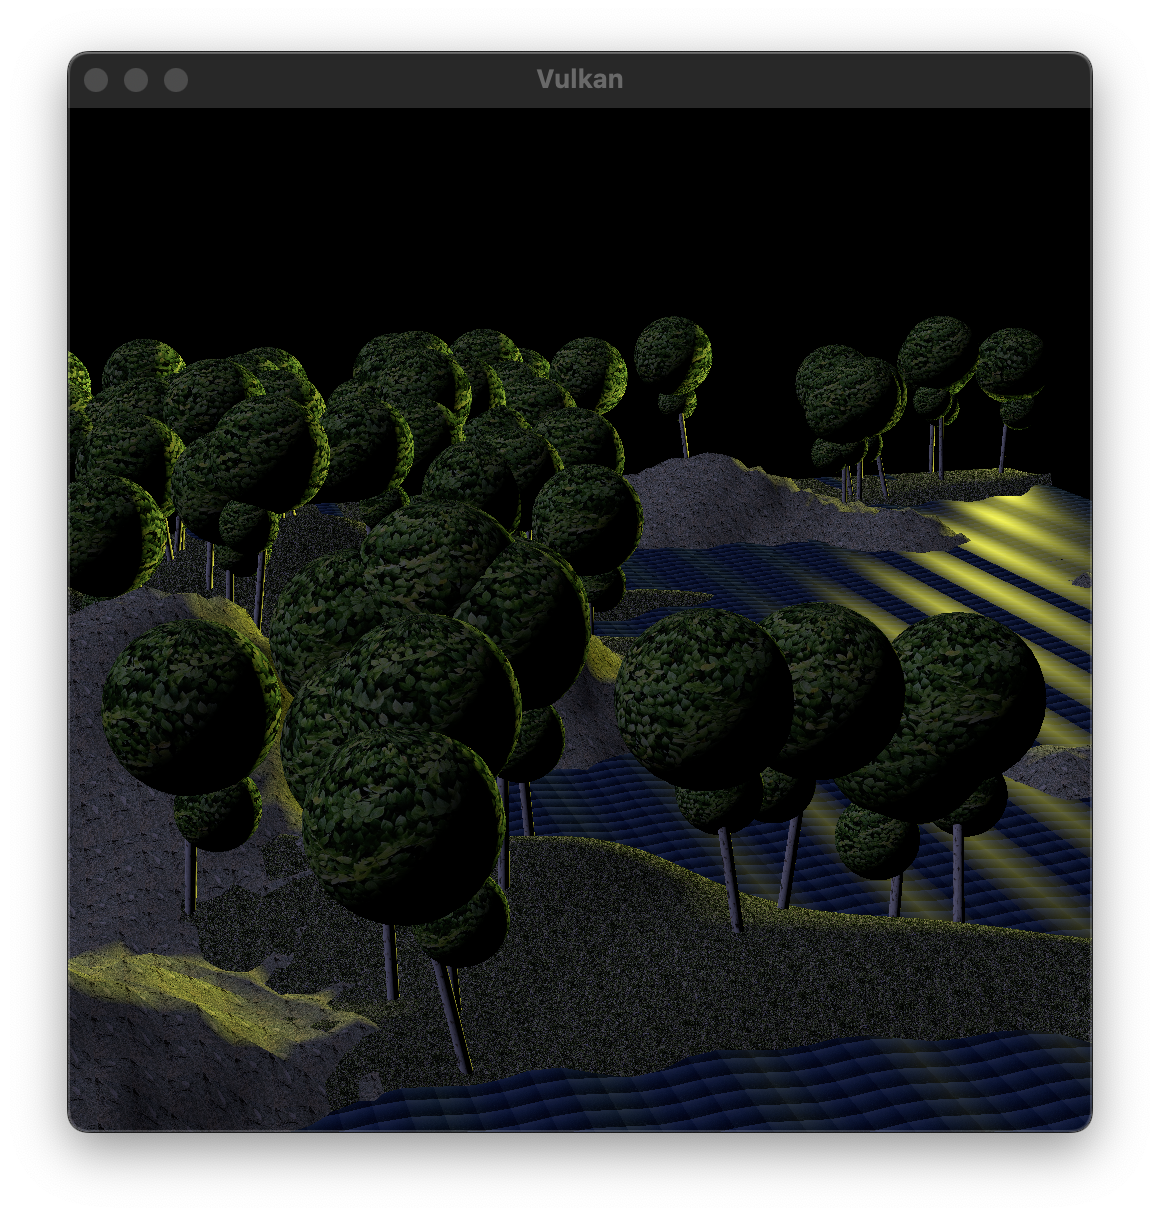
600mainAmbient.c: In a copy of 590mainPositional.c, edit the code to use the new shaders and update the scene uniforms, setting cambient to a sensible value. Test. To see the effects better, you might want to temporarily turn off one or both of the actual lights. (What's a really easy way to do that?) Here's mine, with moonlight from the left side, firelight from the upper-right corner, and almost no ambient light:
You have nine files to hand in: three 580 files, three 590 files, and three 600 files. Submit them to COURSES in the usual way.
In 520shader.frag, there is an intensity variable. How does it resemble today's work? How does it differ from today's work?
Today we implement Phong specular reflection. The details depend on whether the camera is perspective or orthographic (or something else). For simplicity, we handle only the perspective case. Then you can implement attenuation, spot light, or fog, if you like.
610shader.vert: In a copy of 600shader.vert, add pcamera to the scene uniforms and cspecular to the body uniforms.
610shader.frag: In a copy of 600shader.frag, update the scene uniforms and body uniforms. Based on pcamera and pfragment, compute ucamera. Implement specular reflection for both actual lights. For simplicity, let's agree that the shininess is hard-coded to 64.0.
610mainSpecular.c: In a copy of 600mainAmbient.c, edit the code to use the new shaders. Update the scene uniforms and body uniforms. Initialize pcamera to match the world position of the camera. The water should be glossy, and the grass should be matte. (How is this possible, if both have shininess 64?) You can decide the glossiness of the other bodies. The camera should be locked to perspective mode. Test. Here's mine, showing specular reflection of firelight on the water:
Submit the three 610 files to COURSES in the usual way. (And, if you choose to do any of the following exercises, then please submit those files too.)
620shader.vert: In a copy of 610shader.vert, add the attenuation coefficient a to the scene uniforms.
620shader.frag: In a copy of 610shader.frag, update the scene uniforms. Use a to attenuate the light from the positional light source.
620mainAttenuation.c: In a copy of 610mainSpecular.c, edit the code to use the new shaders. Update the scene uniforms. Set a, by trial and error, until you find a good value. You might be surprised at what that value is. My screenshot is below left.
630shader.vert: In a copy of your most recent vertex shader, add scene uniforms to turn the positional light into a spot light. You need the direction uspot and the cosine of the angle σ.
630shader.frag: In a copy of your most recent fragment shader, update the scene uniforms. Implement the spot light cutoff on the diffuse and specular contributions of the positional light.
630mainSpot.c: In a copy of your most recent main.c, edit the code to use the new shaders. Update the scene uniforms, initializing them to reasonable values. Test. I found it helpful to raise the positional light higher in the air, so that it could shine down on the scene. My screenshot is above center.
If you do this exercise, then you might want to base it on version 610 or 620 rather than version 630. Why? Because a spot light in a fog might look bad, because we're not modeling the scattering of the light by the fog. In fact, you might want to re-think your configuration of the directional light, positional light, and ambient light. In a foggy scene, light should be "soft" rather than "sharp".
640shader.vert: In a copy of a recent vertex shader, add a scene uniform for the fog color cfog and the fog bound b.
640shader.frag: In a copy of a recent fragment shader, update the scene uniforms. Implement the fog effect.
640mainFog.c: In a copy of a recent main.c, edit the code to use the new shaders. Update the scene uniforms, initializing them to reasonable values. Test. I also changed the light colors and background color, and I made the camera first-person (meaning, at the hero). My screenshot is above right.
How is the specular reflection calculation different for an orthographic camera? (Hint: The relationship between perspective and orthographic cameras is analogous to the relationship between positional and directional lights.)
How did I make the fog demo first-person instead of our usual third-person? What edits to the code does this change require?
Consider all of the lighting effects in 610mainSpecular.c (for example). Could we implement them in the software triangle rasterizer from our first project? If not, why not? If so, what would unifDim, attrDim, and varyDim be?